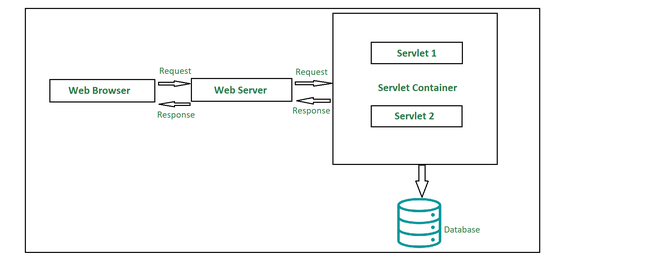
Servlets are Java class that are part of the Java Enterprise Edition (Java EE/Jakarta EE). They handles HTTP requests and responses. Servlet lives on the server and runs inside a Servlet container (like Tomcat, Tomcat itself is also a web server in most Java setups).
Role of Servlet:
- Receive HTTP requests from clients (usually a browser)
- Process the request (maybe access a database)
- Return a response (like an HTML page, JSON, etc.)
Servlet container
Servlet needs a container to run. A servlet container is a runtime environment for Java servlets, responsible for managing their lifecycle, processing HTTP requests, and generating responses. A popular option is the Apache Tomcat server; Tomcat is also the default Spring Boot servlet container (spring-boot-starter-web).
Apache Tomcat
Apache Tomcat is a Servlet container and a web server. It:
- Runs and manages Servlets
- Accepts HTTP requests
- Maps them to Servlets
- Sends back HTTP responses
Think of Tomcat as the engine that runs your web app and manages the lifecycle of your Servlets.
Run your project on Tomcat
Tomcat is a Servlet container + web server.
If you want to run your Java application on server, you have to create a .war file (Web Application Archive) that contains your project files:
- Your compiled Java code (classes)
- Libraries (JARs)
- Configuration files (like
web.xml) - Static resources (HTML, CSS, JS)
- Metadata (like
META-INFandWEB-INFfolders)
It’s the standard format for deploying Java web apps to a server like Tomcat. You generate it using tools like:
- Maven (
mvn package) - Gradle (
gradle build)
You have two way to run your WAR on Tomcat.
Standalone Tomcat
- Go to the
webapps/folder inside your Tomcat installation - Drop your
your-app.warfile there - Start Tomcat (e.g., using
bin/startup.shorstartup.bat) - Tomcat will unpack the WAR and run the app
Embedded Tomcat (e.g. If you are using Spring Boot)
You usually don’t need a separate Tomcat, and. don’t need to add embedded Tomcat in your project dependency if you are using Spring Boot because Spring Boot already includes embedded Tomcat by default.
Here in this page we discuss the the traditional Servlet + Tomcat configuration, you have to manually add the Servlet and Tomcat dependency in your pom.xml file if you are using Maven for dependency management.
<dependencies>
    <dependency>
        <groupId>jakarta.servlet</groupId>
        <artifactId>jakarta.servlet-api</artifactId>
        <version>5.0.0</version>
        <scope>provided</scope>
    </dependency>

    <dependency>
        <groupId>org.apache.tomcat.embed</groupId>
        <artifactId>tomcat-embed-core</artifactId>
        <version>10.1.16</version>
    </dependency>

    <dependency>
        <groupId>org.apache.tomcat.embed</groupId>
        <artifactId>tomcat-embed-jasper</artifactId>
        <version>10.1.16</version>
    </dependency>
</dependencies>
Create servlet project
// File: HelloServlet.java
package com.example;

import jakarta.servlet.*;
import jakarta.servlet.http.*;
import java.io.IOException;

public class HelloServlet extends HttpServlet {
    // The service method gets executed for any HTTP request (GET, POST, etc.)
    // Whatever data comes from the client will be stored in the `req` object
    // Whatever you send back will go through the `resp` object
    public void service(HttpServletRequest req, HttpServletResponse resp) { }
}
The service() method handles all types of requests. You can override doGet(), doPost(), etc., for more control.
Run Tomcat and Servlet mapping
import org.apache.catalina.startup.Tomcat;

public class App {
	public static void main(String[] args) {
		Tomcat tomcat = new Tomcat();
		tomcat.setPort(8081); // By default 8080
		tomcat.start();
		tomcat.getServer().await();

		Context context = tomcat.addContext("", null);
		Tomcat.addservlet(context, "HelloServlet", new HelloServlet());
		context.addServletMappingDecoded("/hello:", "HelloServlet");

		tomcat.start();
		// Keep running and wait until the server is manually stopped
		tomcat.getServer().await();
	}
}
Now if you run this main() method, your servlet will be available at:
http://localhost:8081/hello
Response to the client
The role of Servlet, which in the Servlet class, you can accept requests, process requests, and return requests (which is what below example demonstrates).
Let’s use doGet() instead of service() for better clarity and REST-style design:
public class HelloServlet extends HttpServlet {
	// To perform specific web requests (GET, POST, DELETE, PUT)
	// In this case we are getting requestes, we can use a specific method
	// doGet() to get requests from the client
    public void doGet(HttpServletRequest req, HttpServletResponse resp) {
		res.setCContentType("text/html");

	    PrintWriter out = res.getWriter();
	    out.println("<h2>Hello World<\h2>")
    }
}
However, writing large chunks of HTML code directly in Java can be a nightmare, especially when it comes to debugging. Therefore, we have different view technologies to better present data to the client. But before this, you will learn the Model View Controller (MVC) architecture which help you write cleaner, maintainable web applications.
Back to parent page: Java Enterprise Edition (Java EE)